RTM: What it means

Gold disc-lgRTM is an acronym for “Release To Manufacturing”.  In the software industry, it’s usually used as a label for a certain released version of a piece of software.  For example, before Microsoft releases a new version of Windows to the public, they’ll release several test versions (called “beta” versions) to a select few, then a larger release to some developers, then a test release that they believe is done, called a release candidate “RC”.  Finally, once they’ve decided that no more changes will be made, they’ll release the product to the manufacturers (RTM) so that they can start mass producing DVDs for sale in stores and distribution with new PCs.

An RTM version isn’t necessarily held back for the DVD producers to ship.  Microsoft generally releases the RTM to paid subscribers to their Microsoft Developer Network (MSDN) several months before the official release date.  For example, with Windows 7, Microsoft made the RTM version available for download on their MSDN website in early August 2009, even though the same version wasn’t released until October 22, 2009 for the general public to purchase or to receive on a new PC.

Windows 7 Explorer: Getting the tree view back

Strangely, there’s been a LOT of hoopla about how much Windows 7’s user interface is much improved over both Vista and XP.  My experience has been the exact opposite.  Windows 7’s user interface is seriously dumbed down with many important and critical elements disabled or removed.  One in particular is in Windows 7’s explorer (not to be confused with Internet Explorer… Windows Explorer is the program you use to browser your hard drives and files).

The major design flaw in Windows 7’s Explorer is that as you’re drilling down into deeper and deeper folders, the tree view under “My Computer” on the left pane does NOT stay synchronized.  This is just crazy and makes absolutely no sense whatsoever.  It can be fixed though and here’s how:

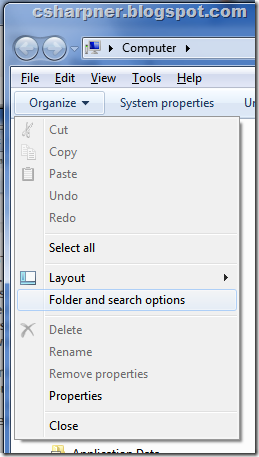
  1. In Windows Explorer, open the “Organize” menu and choose “Folder and search options”.image
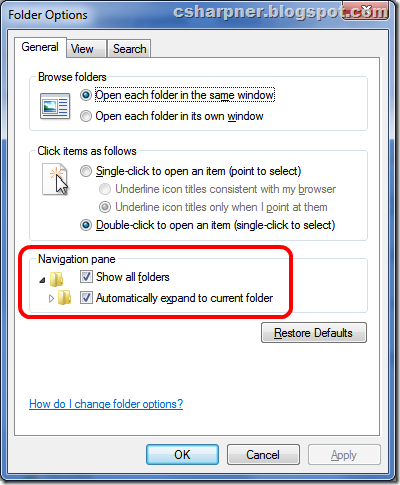
  2. Next, in the Folder Options pane, in the “Navigation pane” group (highlighted in red in my image), make sure that BOTH “Show all folders” and “Automatically expand to current folder” are checked, then click “OK”.image

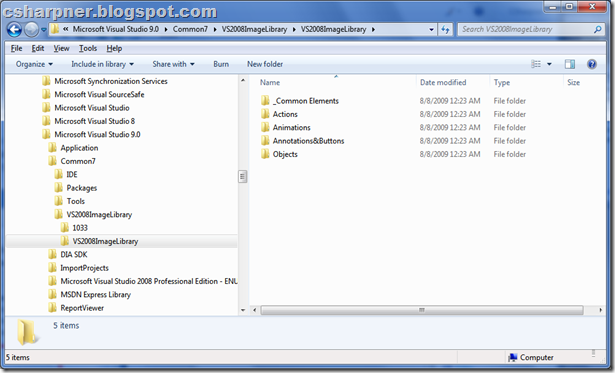
Now, when you drill down deep into folders or however you get to a folder, your tree view will behave as expected (and as needed):

image

You’re welcome!

Here are some related articles:

  • Get your Quick Launch bar back under Windows 7
  • What’s wrong with Windows 7’s Task Bar (or “Super …
  • Windows 7 Classic Start Menu
  • Get your Quick Launch bar back under Windows 10, 8, & 7

    [Update] This still works on Windows 10 and Windows 8.

    Windows 7 supposedly improves the user interface, but in my experience it’s MUCH WORSE than Vista’s UI.  One of the things that really sux is that there’s no longer a Quick Launch bar on the task bar.  Microsoft claims that the new “super bar” has all the Quick Launch bar features already built in.  This is not true.  Read this post to see why:

    It’s actually not totally gone.  Here’s how to get it back:

    1. Unlock the taskbar (if it’s locked): Right-click an empty area on the task bar and uncheck “Lock the taskbar” if it’s checked.
    2. Right click the task bar (or the “SuperBar”), choose “Toolbars”, then “New Toolbar…”
    3. In the “Folder:” field, enter “%appdata%\Microsoft\Internet Explorer\Quick Launch” (without the quotes, of course):imageand click “Select Folder”.  You’ll see this on the right side of the task bar, just to the left of the system tray (now called the “notification area”):  image
    4. You have your Quick Launch bar back, but you still need to fiddle with it to get it looking like it did before.  First, grab the dotted area to the left of the “Q” in “Quick Launch” and drag the bar to where you want it on your task bar.
    5. Next, you’ll need to change the text and icon sizes to your preferences.  The default for XP and Vista was no text and small icons.  To do that, right-click your new Quick Launch bar and uncheck “Show Text”.
    6. You’ll probably want to get rid of the rather large “Quick Launch” label as well.  Right click a blank area on the Quick Launch bar and uncheck “Show title”.

    Your right-click (or “context”) menu should now look like this: image

    Your Quick Launch bar is now complete and should look something like this:

    image

    You can now drag program icons into it just as you did before.  You can now launch as many instances as you need by clicking once for each instance.  You’ll now get a separate button on the task bar (outside of the quick launch area) for each instance.  You’ll now be able to clearly tell which icons are launch icons and which ones are running icons.

    Now, just rearrange your Quick Launch icons to your liking and you’re back in business!

    You’re welcome!

    Here are some related articles:

    What’s wrong with Windows 7’s Task Bar (or “Super Bar”)?

    I’ve been using Windows 7 as my primary OS at home since 8/8/2009.  This is not the beta version.  This is the SAME version that will be released to the public in a few days on 10/22/2009.  One of the first things you notice that’s different from Vista is the task bar (also referred to now as the inaccurately named “SuperBar”).  If you had a quick launch bar in XP or Vista, it’s now gone.

    To get it back, read this:

    The new “super bar” is supposed to be better than the old task bar with the following explanation:

    • Program icons can be “pinned” to the super bar, so they’re always there, so you don’t need the Quick Launch bar anymore.
    • The same icon is used for both running and pinned applications.
    • Right-clicking a running program icon now has a new “jump list” menu.

    Here’s why this is actually worse than the previous task bar:

    • A “pinned” icon is almost visually indistinguishable from a running icon, varying in appearance by only an ever so slight change in the border of the icon.  In the old task bar with Quick Launch icons as small 16×16 icons in a separate area, and running program icons as larger (wider) icons on a separate area, there was no question as to which was which.  There have been many complaints about this.
    • With the old quick launch and taskbar, to start multiple instances of the same program, you click that icon in the quick launch as many times as you need instances.  In the new Windows 7 task bar, clicking a program icon the first time starts it, clicking it the second time minimizes it, then restores, then minimizes, etc…  How do you get another instance running?  (There’s actually a way, but it’s not intuitive, like the old Quick Launch bar was) and it only works with a 3 button mouse.  To launch multiple instances, click the center mouse button (usually the “wheel” button).  If you didn’t know that, it’d be difficult, if not impossible to figure out, much less, to even know that it’s still an option.
    • To minimize, restore, or maximize a program window, in the old task bar, you could right click the running program icon and choose “minimize”, “restore”, or “maximize”.  Now with the new Windows 7 jump menus, those options are now gone.

    Gee, THANKS Microsoft!

    Here are some related articles:

  • Windows 7 Explorer: Getting the tree view back
  • Get your Quick Launch bar back under Windows 7
  • Windows 7 Classic Start Menu
  • How to handle ctl00_ContentPlaceHolder in JavaScript

    If you develop in ASP.NET, you’ll notice when you run your web app, that your server side components get a name similar to “ctl00_ContentPlaceHolder” prepended to the name you assigned them.  To further frustrate things, that prefix is not guaranteed to be that from build to build.  So, how do you reference such an object from JavaScript?

    Assume you have an image object on your page.  At design time, the HTML for the image might look like this:

    <

    asp:Image ID="LogoImage" runat="server" ImageUrl="~/Images/logo.png" />

    Here’s a “compiled” and running HTML version of what an object might look like in the runtime HTML:

    <img id="ctl100_ContentPlaceHolder1_LogoImage" src="/Images/logo.png" style="border-width:0px"/>

    The problem is you don’t want to reference the object in JavaScript like this:

    document.getElementById("ctl100_ContentPlaceHolder1_LogoImage")

    Instead, do this:

    document.getElementById("<%=LogoImage.ClientID%>")

    Now your JavaScript is guaranteed to work even if the prefix changes with later compiles or updates to Visual Studio.

    TomTom Go 630 Review

    image

    The Good:

    • Above average features:

      • 2D or 3D maps.
      • Change the cursor to one of about 7 or so car icons (or the default arrow).
      • Select from several different color schemes for the map and the course (you can clearly see the course line, unlike the Magellan GPS units whose course lines are light green on a light greenish-tan background). I previously had a Magellan 4070 until a little more than a week ago when it and a Cobra radar detector were stolen out of my car in my driveway!
      • Speed Limits.
      • Map Corrections:  This is a GREAT feature.  You can add names to streets, change names, change speed limits, delete streets, change locations of POIs (Points Of Interest).
        • You can upload these changes to TomTom and they’ll validate, then share with all other TomTom users.
        • You can download corrections from others.
        • When you make a correction, you have the option of entering a description of the change for the TomTom cartographers if it’s something other than a street name change, deletion, or change of POI.
      • Bluetooth to make it a wireless speaker phone by connecting wirelessly to your Bluetooth enabled phone.
      • Voice recognition.
      • A handful selection of different voices to choose from.
      • Large LCD screen.
      • Traffic light and Speed camera warnings
        • Though, it seems that they only show an icon on the screen and give no audible warning, which makes it mostly useless.
        • It comes with a preset of locations pre-installed, but you get to do one free update on the web to get the latest.  After that, you’ll have to purchase a subscription for changes.
      • Can connect to the internet (via a USB connection to your computer) to download the latest maps as often as you want.
      • Your choice of alphabetized (default) keyboard or QWERTY keyboard.  Unfortunately, it defaults to alphabetized keyboard.  After searching, I found you can actually change it to QWERTY.  There’s no excuse for any device to provide ONLY (or default to) an alphabetized keyboard since everyone these days types on a QWERTY keyboard.
      • Smart course plotting called “IQ route”.  Depending on the day and the time of day you plot your course, you may get different routes because of known traffic patterns.  If you plot a course during say, rush hour, it will try to route you around known locations for slow moving traffic.  Route the same course for late Sunday night, and you’ll get a different (and presumably quicker) route.  This is a feature that’s been lacking in most GPS units for a long time, but severely needed.
      • Option to bypass unpaved roads.
      • Save itineraries.
      • They’ve opened up this product to developers and have released and SDK so you can write your own apps for it in C++.
      • App store.
      • Backup your data to your PC.
      • TomTom HOME PC application to hook up your device to your PC and do all sorts of cool stuff with it.  This is where you access the app store, backup, send/receive map corrections, etc…
      • If you run a company that deals with transportation, you can customize this for your company’s use and set up a server where your users can update their TomTom Go 630’s from.
      • Plan routes for driving, biking, or walking.  Obviously, walking routes will take you through parks and such (off road).


    • Standard stuff you expect:

      • Spoken voice, turn-by-turn directions
      • Shows where you are on the map as you’re driving
      • Current speed
      • Compass
      • Volume control
      • POI (Points of interest)
      • Favorites
      • Standard mini-USB port to connect to your computer.
      • On screen keyboard.
      • Reroute around detours.
      • Options to bypass toll roads.
      • Bright colors for viewing in daylight
      • Dark colors for viewing at night.
      • Road Hazard warnings (via an FM receiver).
      • Search by name.
      • Itineraries (set multiple waypoints on a larger journey).
      • Bypass toll roads.


    The Useless:

    • Photo uploads (for slideshows)
    • MP3 music player


    The Bad:

    • The mounting of the GPS unit onto the windshield hanger is difficult.
    • Correction (2009-08-18) on the statement below.  It does have search by name… It’s just difficult to find.
      • [The following statement is false] It lacks a very important “Search by name” feature.  For example, if you know the name of a place, but not where it is, you’re out of luck.  This is a critical feature and there’s no excuse for not having it.  Both Garmin and Magellan GPS units have this feature.
    • Volume is too low, even at its maximum setting, even after turning off “adjust for background noise”.
    • It’s a little bulky, having just come from owning a Magellan Maestro 4070, which was flat, front and back, and pretty thin, this one is curved on the back and about twice as thick as the Magellan Maestro 4070, but compared to the Garman Street Pilot C130 (which is shaped like an old CRT TV at about 4 inches deep) it’s reasonably thin.  Can easily fit it into my pants pocket.


    Extra (paid extra) features:

    • Celebrity voice such as Dennis Hopper, Burt Reynolds, and Homer Simpson can be purchased and downloaded.  They range from about $5 to $13.
    • Applications:  This is very cool.  There’s an actual “apps store” where you can download all kinds of apps (and pay for them) for things like recording your path as you drive for export to Google Earth KML files and such.  I’ve often wondered why others don’t have this feature considering these GPS units are basically pocket computers that can do A LOT more than just navigate.
    • Traffic Light and Speed cameras (both fixed and mobile) updates.  You have to subscribe to this service to continuously get the latest.
    • Live Traffic.
    • By default, it does NOT switch between daytime and nighttime colors.  There is a setting, buried deep inside the menu system to enable this though.


    Conclusion:

    Overall, this is a very nice, windshield or dash mounted GPS navigation system.  The ability to make your own corrections, share with others, and receive corrections is awesome.  The feature to plot a course based on when you’re driving is very nice, especially if conditions change as you’re driving, it can suggest alternatives.  This is much more than "just a GPS" compared to the other 2 I’ve had (Garman Street Pilot C130 and Magellan Maestro 4070).  TomTom seems to be really on the ball with milking as much out of it as possible and going even further by opening it up to developers.  I’m gunna download the SDK and play around with it.  I will report back on that after I’ve written an app.  The more I use this thing, the more I like it.

    Uninstalling Windows Live Family Safety Filter

    If you’ve installed Windows Live Family Safety Filter and have since decided you want to uninstall it, you’ll find that the following items you need to uninstall it don’t exist:

    1. A “Windows Live Family Safety Filter” folder or icon under the programs menu in the start menu.
    2. In control panel, a listing for “Windows Live Family Safety Filter” under “uninstall a program”.

    So, how the heck are you supposed to uninstall it?  Like so:

    • Go to Control Panel (There are so many different ways to get to the control panel with all the popularly used versions of Windows, I’ll leave it up to you to know how to do this in your own version).
    • Choose “Uninstall a program”.
    • Double click on “Windows Live Essentials:

    image 

    • Choose “Uninstall” on the “Uninstall or repair your Windows Live programs” then click “Continue”.

    image 

    • Put a check mark beside ONLY “Family Safety” (You’re choosing what you want REMOVED).  Then click “Continue”.

    image 

    Then, you’ll finish through these two windows…

    image image

    That’s it!

    Dish Network gift cards

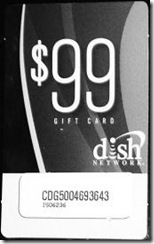
    Occasionally I’ll have a gift card or something that I can’t use myself, but that I’ll get a discount on my own service if someone else uses it.  I’ve got 2 one-time-use gift cards from Dish Network.  The images are below.  To use either of them, follow the directions I’ve posted just below them.  If you don’t mind, let me know once you’ve used one (and which one) so I can take it off this blog.

    GiftCard1 GiftCard2

    DishNetwork Gift Card (copied from the text on the back of the cards):

    This special Gift Card entitles you to DISH Network Satellite TV for the whole house
    (up to 4 rooms) with Digital Advantage including:

    • FREE Activation w/ Gift Card (a $99 value)*
    • $80 CREDIT on your first bill*
    • FREE HBO* and Starz for 3 months (up to a $66 value)*
    • FREE HD DVR Equipment Upgrade

    Visit your local participating Retailer or call 1-800-920-GIFT (4438)

    *Requires 24-month commitment.
    Early concellation fee applies.
    Expires 1/31/09.  No cash value.
    Includes Standard Professional Installation.
    Gift Card may be valid for other promotions.

    Deploying a Click Once app to multiple environments

    Problem:

    You can’t move a "Click-Once" deployed application from one environment (or server) to another.

    Details of problem:

    If you work in a normal IT shop, you probably have multiple, duplicated environments set up for your code. For example a typical set of environments would be for:

    1. Development

    · Used by the developers while developing their code.

    2. Staging/QA/Testing

    · The developer usually places (or requests System Admins to place) their release candidates here for users to test and validate.

    3. Production

    · Once the users have validated the release candidate in the staging environment, the system administrators are asked to move it to production or the "Live" environment.

    Each of the 3 environments usually have duplicated database servers and web servers, and potentially duplicated network shares and any other resources needed by an application.

    If your work environment has good security procedures put in place, your developers probably don’t have access to make changes to the staging environment and they almost certainly don’t have access to making changes to the production environment. This is a win-win for everyone involved: It makes those in charge of IT security happy and it gives the developers plausible deniability when something goes wrong in an environment that they don’t have access to.

    Most web applications are deployed, usually by the developer, to the development environment. Once the developer is happy with the code there, they will ask the system administrators to move that code to staging. The key here is that it’s the SAME binaries that the developer put in the development environment. The system administrator will likely make changes to the web.config file to change the database connection string(s) to point to the staging database(s) instead of the development one(s) and any other config changes needed to make the staging code use the staging resources and not the development resources. This connection string, for security reasons, is usually not provided to the developer. Later, after users test on staging, the system administrator will then move that same code to production, making the appropriate changes to the config files.

    This process of moving the same binaries from environment to environment is critical to ensuring that what gets moved from one environment to the next is the actual code that was tested in the prior environment. Hence the problem…

    To deploy a Click-Once application, you have to provide, at build time, from within Visual Studio, the URL from where the end users will be launching the application. YOU CANNOT CHANGE THIS AFTER DEPLOYMENT!!! This means, the deployment model described above, that is in common use, cannot work with a Click-Once deployed app. Once you build and publish from Visual Studio, the "launch from URL" is in the deployed files and the deployed files are CRC’d as part of the Click-Once deployment. When a user runs the application, one of the first things that happen is that the .NET Click-Once technology on the end user’s machine kicks in and validates that all the files are in the original condition they were in when deployed from Visual Studio by validating the CRC. If it detects that a config file (or any file) has been altered, it throws a security exception and will refuse to run the application.

    The "Solution":

    I put the word "solution" in quotes to imply that this is not really a solution. It is a work around that does not resolve the problem of needing to deploy a single binary image from environment to environment. Only Microsoft can fix that problem. Instead, this is a description of how you have to deploy to multiple environments and the deployment changes your system administrators will have no choice but to adopt. This is not a preference, but a technical requirement. There is no alternative with Visual Studio 2008. I have been told, BTW, that this will be fixed in Visual Studio 2010.

    Here’s what you do:

    After you’ve deployed to your development environment, take a snapshot of your code in whatever method you prefer; whether that’s making a copy of the entire solution to another sub-folder, or checking it into your source control repository and labeling it, or whatever other method you can concoct. You must do this because later, when you deploy to other environments, a significant amount of time may have passed and you may have continued on with developing newer features and your code will not be the same. You’ll need the older snapshot to rebuild to the staging environment, then again to the production environment.

    Later, after your own testing in development, when you’re ready to deploy a release candidate, you’ll need to rebuild from that snapshot codebase, but making only the appropriate changes to make it build for the new environment (the "launch from URL" and the config file changes). Then again, some time later, after the users have tested and validated the staging code, you’ll need to rebuild again for the production environment, using that same snapshot, making the appropriate "launch from URL" and config file changes.

    Alternate Solution:

    Note: Most system administrators would not want to do this alternate solution, but it is a more secure strategy and removes the blame for differences in environments off your shoulders.

    Pre-requisites:

    · The system administrator who will be performing the move needs:

    o The same version of Visual Studio you used to create it.

    o All of the 3rd party and custom add-ons (like Telerik, LLBLGen, Oracle, DB2, or other database Providers and drivers, etc…) installed and configured.

    o Access to your source control system or a copy of the snapshot of your source code.

    o Knowledge of how to build and deploy Click-Once applications using Visual Studio.

    o A compilable, error free, snapshot of your code.

    1. When you ask the system administrator to move your code from dev to staging, you instead provide them with your snapshot of the source code, whether it’s a labeled version in your source code repository or a copy in a folder somewhere.

    2. The sysadmin then configures, builds, and deploys your code to the staging environment.

    3. Later, when the users have validated your staging deployment, you then ask the system administrator to redeploy that snapshot to production, where the admin will make the necessary config changes and build and deploy to production.

    This actually requires less work for the developer, is more secure, and gives a little more insurance to the customer that what they tested is actually what’s being deployed to production. At the very least, it removes the blame off the developer’s shoulders if something is changed between environments.